How to fail when painting with rubber paint
Well. After the first car painting success, I decided that another car painting exercise could be done. Again I am using solvent based rubber paint.
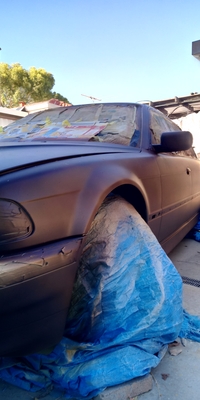
My current daily driver is an old (1995) BMW 7 series limo. Being 25 years old, the 25 year old paint needed some attention, not to mention a plethora of car park dents to be removed.
The plan:
Step 1 - remove the dents
Step 2 - masking
step 3 - preparation
step 4 - add paint. Lots of paint!
Step 1 - Dent Removal
Removing dents, especially car park type dents, is a pain. The paintless dent remover people will charge $100 per minor imperfection, more if it is bigger than a finger (at least that is how it seems). Being cheap, I figured that I could just bog the dents and be done with it. However the nice folk at the local car paint supply place suggested that I get my own dent remover tool and learn how to use that, resorting to bog if there was something I could not remove.
Ok, I can do that! So I spent the money on a tool, invested more time on the interweb and off I went. Surprisingly I managed to get all but one of the dents on the sides of the car removed! Nice :) The one remaining is right on one of the front wheel arches, and it stubbornly refused all attempts at coming out. In the end I gave up and it is still there. Maybe next time!
My advice: if you have time and patience get a remover tool for yourself and have a go. It really is not too scary :)
Step 2 - Masking
Masking such a large car is actually not that hard. Fortunately the rubber side bump stops come off with relative ease (if you follow the advice found on BMW enthusiast websites). There are few lights to be removed. I removed the two side indicators with the rubber bump stops and removed the rear license plate lights. Wrap a little masking tape around the power plugs and tuck them in the panel work. Easy :)
With rubber paint, masking headlights, tail lights and fog lamps is almost not worth it. Better to simply paint with the car and peel off later. The amount of overspray will cover them so tape is just not worth the hassle.
Windows, on the other hand, needs lots of covering. Front and rear windscreen are best left with about 1cm between the edges and masking tape. The paint build-up makes getting a smooth edge finish a breeze. Plenty of paper or one of the 'tape-n-drape' covers make this a quick, pain-free, task.
Side windows are a bit different. The bright-work above the doors (drip rail) and the lower edge (on the doors) are impossible to remove without breaking the plastic clips. The clips themselves can be got, but the last time I searched them out it was going to cost about 30 quid plus freight for enough to do both sides of the car. Mental. Instead I taped about half-way over these, which allows for a build-up of paint. The upper just peels off nicely, and the lower can be removed easily by running along the underside of the trim with a sharp knife, then peel off the paint. Clean edges, no problem. Plenty of paper or tape-n-drape and you are good to go.
Wheels. Ah wheels. I went to a local thrift shop and bought a bunch of single bed-sheets. $12 for 4 and was good to go. The fitted sheets are brilliant for this. They stay put even when wind is you enemy. Do not bother using tarpaulins. They are a total pain, fall out at the slightest encouragement, get in the way, never sit quite right. Just don't go there.
Step 3 - Preparation
There are plenty of videos on-line showing how to manage all other paint preparation. Once dents are done and filling has been sanded back, a light painting with a primer can be done. Sanding back (other than body fill and anything else that is nasty, like clear coat that has peeled off) can be minimised. Cleaning with solvent is a must. This makes sure you have a clean surface for the rubber paint to go on. No, you don't have to block sand the whole car, just imperfections :)
Tip: Always make sure you have no 'edges' on body-filler. They will really stand out once the rubber paint is on. For some reason it does not like filling in those sorts of gap (unless you use one of the 'oops I made a mistake' paint tricks). Better to just do it right the first time.
Step 4 - Adding Paint
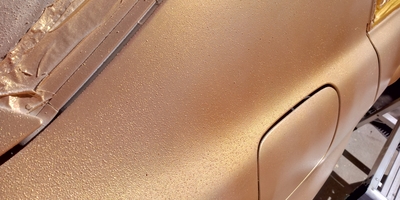
Now for the litany of disasters. In the limo project all went well right up until this point.
Whew!
How to fix the paint problems?
The paint lumps can be reduced by smoothing using a mix of solvent and paint, about 3 solvent to 1 paint. This can be rubbed gently over the affected areas until the lumps have been melted smooth. This does seem to work pretty well, but take care not to use too much solvent or you will cause the paint to craze or separate. That is really hard to repair.
An alternative is to apply several really heavy layers paint. This has a wetting effect (partly to smooth) and a building up effect (to fill around the lumps). This works reasonably well on the larger horizontal areas like the roof.
Laying rubber paint on quite thick is ok when painting solid colour layers. If runs happen, spray on a little more paint and then use air to spread it out a little more. By the time the next full layer of paint is on you will never know the run ever happened.
You will not be able to do that with anything transparent, especially those with solids (sparkly glitters in clear for instance). Anyone have a trick for overcoming this? Anyone?
Thermo chromic Pigments - things you will need to know
Thermo chromic, colour-change, like the fancy pearls, are solids within the paint medium. This causes some problems when painting. The normal 'wet edge' style, used for solid colours or clear coats do not work at all well when solids are involved. The air at the edge of the spray fan tends to push the solids away and you end up with unpainted lines in the paint. Instead use light misting sprays, building up the colour depth slowly. This is difficult with rubber paint because light sprays tend to dry quickly causing the paint to be a bit lumpy. Getting the balance is challenging!
I started by using the wet spray method, only to discover that the paint pigment got pushed about leaving 'lines'. Even after painting in 4 criss-cross directions there are areas with more pigment than others so the look is patchy at times. If you can get excellent results using pearls, then you will be fine with thermo chromic.
Next consideration is the thermo chromic paint pigment and mixing this in to the paint. The information material I obtained from the manufacturer suggested that 10gm per 1 litre would be about right. Not even close. More like 40 or 50gm per litre. Be prepared!
Normally with pearls and the like you will mix these with solvent then leave it overnight to settle, then mix in with you paint when thinning. Not so with thermo chromic! Mix the pigment when you are going to paint, not before. Even a delay of 24 hours will have the pigment start to go grey, not coloured. Mixing needs to be thorough. I did 2 4litre tins at a time, adding thinner to a third tin. I mixed the pigment into the thinner, then pour between tins lots of times to get it all mixed thoroughly. Then use the power mixer to make sure, even between each spray.
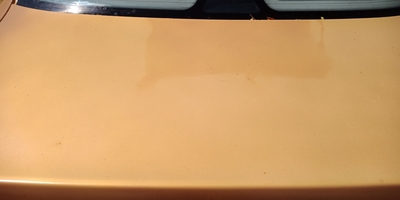
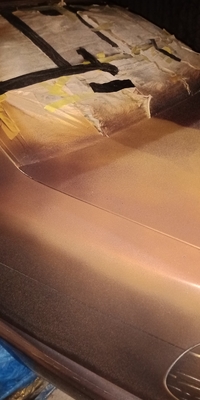
Documentation also states that this material does not like UV very much. What is not mentioned is that the pigment really does not like UV when it is curing. After it is cured it seems to be pretty stable. The boot (trunk) lid is a case in point. I had painted this one morning but the wind came up so I stopped. The wind managed to dislodge some newspaper being used to mask the rear glass. No big deal, or so I thought. Next morning, while preparing for the morning paint session, I discovered this. Yup, really good result where it was covered by the paper. So if you want best results then keep the car covered and completely out of the sun while painting/waiting for the paint to cure.
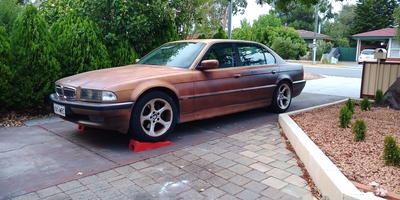
In my project I added a thermo chromic pigment over gold colour. Black that turns transparent at 31 degrees. The goal was to have the gold come out when the car gets warm. Actually this turns out to not be 'at' 31 degrees, rather 'by' 31 degrees. Knowing this now I would be more likely to choose a colour change over 40 or 45 degrees C. I suspect the effect would be more vivid.
The final consideration is that the pigment, when clear, is not actually completely clear. It has a slight grey look to it and has had the effect of making the really glossy gold look more weathered/dull. Still gold, just not so glossy. A pity because the gold was actually a very nice colour and a goodly dose of metal flake in there really sparkles.
Reflective clear pearls
The final effect I had wanted to get on the car was for the car to reflect when struck by light at night, something like the road signs. Ok, not so glow-in-the-dark as they are, but you get the idea.
I had been looking at spray paint with the glass beads in it for that effect. The manufacturer of the paint pigments also does those reflective beads, so I bought some of them. I did a test spray across the lower sills and a couple of other places. No glowing goodness. I tried layering the paint up, but still no reflective action. To be fair, it does add some gloss to the finish compared to the gloss rubber paint by itself, but it is a complete fail in terms of reflectivity. Bah.
To get a really good reflection glow you can paint a surface then sprinkle the glass in to that. The glass becomes the outer surface and this is reflective. But it is also not very robust so for my purposes this would be a fail. And would be really hard to do in this scale because the rubber paint is touch dry so quickly.
Finishing up
I added another 12 litres of clear gloss rubber paint to bring up the finish. The gloss rubber is more like a satin. Not matte, but not super glossy either. Given that the paint itself is never super smooth like a 2 pack would be this is not such a bad thing.
You can make this a little more glossy by doing a really super light mist of thinner over the whole car (look at this example). This will add some gloss, but you must be really careful not to even think about being heavy with that or it will damage your finish.
Other notes
I have used the term 'drying' and 'curing' as different terms. The rubber paint can be touch dry in 5 minutes and ready for a next coat in maybe 10-15 minutes. But it will take 24 hours or more to cure and settle in to place. This is because each layer slightly melts the layer before as part of its adhesion, not like traditional paints where you will get clearly defined layers.
Pulling masking is pretty straight forward. This is well described elsewhere on-line. I would suggest leaving for a day or two before removing and be ready to go over some edges with drops of clear to soften and smooth if something goes wrong along the way.
I have left areas of fail quite visible on my car. This is so that it can be used as a 'how not to' training vessel, and to remind me to do better next time, and to point out that this experiment is about overall effect not my painting expertise (or lack thereof). I expect it will be quite daggy looking in 5 years so I am not overly concerned :)
If I had time/inclination I may have added some gold pearl or something, just to bring back the gloss gold finish. But in the end I was about done with experimenting so it is what it is. Maybe next time?
Tips:
tags: Plasti-dip, color dip, rubber paint, thermochromic, thermo chromic, temperature colour change paint, paint fail, failure