Foam Floor Experiment
Actually this is an experiment utilising a couple of unusual features in order to solve a couple of problems identified by my Landlord.
My Landlord has Diabetes, one side effect being something called neuropathy. This is pain, usually at bodily extremities, caused by sugar damaging nerves and nerve endings. His pain is sufficient that he cannot bear to wear anything covering his toes. No socks, no toes. Instead he wears sandals or Jandals/Thong/Flip-flops. Anyways, showering has been a problem for some time. He cannot wear Jandals in the shower (too slippery), so has a foam mat to go on the floor of the shower. Unfortunately the mat gets quite manky so is not really a long-term option.
Next problem - the tiling has started coming apart. There are cracked tiles and chunks of grout missing. The result of that is water getting through into floor and walls. Evidence of paint peeling in various other places demonstrates this has been under way for ages.
The shower recess was originally installed as a 'roman tub' style shower. That is all well and good but as people get older and less agile stepping over and into the shower recess is a pain. Solution is to remove the lip and turn the shower/bathroom into a wet-floor arrangement.
But the removal of the lip provides another challenge - he is unable to bend down or crouch down to clean feet. Currently he uses the roman tub ledge as a foot cleaning aid. So the question is how to add something that will act as a ledge with sufficient strength to take his weight while looking in keeping with the rest of the shower? He had looked at adding a shower ledge 'tile', but they are nothing like strong enough.
Another minor addition that has been waiting to be done for ages is the change to quarter-turn ceramic tap head-works for the shower. No more drips! These have a groovy lever action that lifts the appearance of the shower enclosure and are HEAPS easier to use!
No Worries!
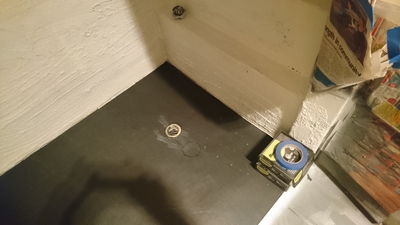
Photos of the process are to be found here. The first image is when the shower recess has the floor tiles and short wall removed and some masking done. The pictures are not labelled at all but appear in chronological order.
So what was done?
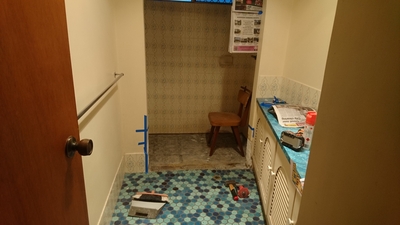
The roman tub lip was removed, as were the floor tiles. This revealed how much water has been getting into the substrate. It took three days with the heater in there before I was comfortable with putting paint material in place! Floor levels were 'adjusted' using a diamond grinding tool on the angle grinder. In particular sufficient depth was needed to allow a new alloy edge to be installed between the new shower recess flooring and the existing bathroom floor tiles. Messy work!
The existing shower rose and tap head-works were removed. The body seats were re-finished (I love power tools - this bit only took about 5 minutes!) and new CD head-works installed. Turn the water supply back on and test for leaks... all good. Phew.
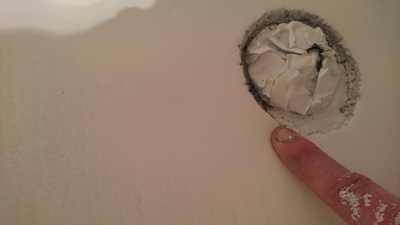
The bath had a set of taps and a spout for the tub feature. My landlord had wanted to keep this feature (easy to fill buckets he says). However when I went to undo the spout the whole fitting fell out of the wall! Seems that some brazing in the wall has been corroded through and leaking for some time. Bah. I had no intention of pulling off wall tiles and digging into the concrete wall to solve this so I went and got some special caps for the tap bodies. These install in place of the head-works assembly; nice and simple. Warning - for some reason they are stupidly expensive $50AUD EACH from the local plumbing wholesaler (I feel dirty having been forced in to paying that much). They worked well once the bodies had been re-seated.
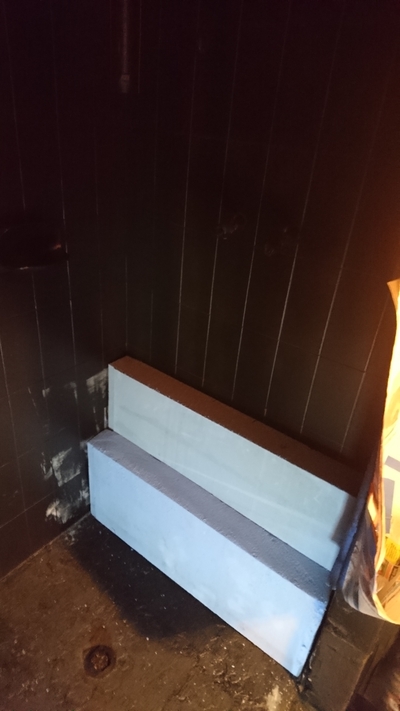
So now there are a couple of caps and a hole in the wall where once were bath taps and spout. Well that really is no problem. I have to add a foot ledge anyways so guess where the step is going now? Yup you guessed it, across the wall where the taps etc were :) As it happens I have plenty of XPS foam insulation panels (for the garage project) so out with the tape measure, find a suitably sized off-cut, and hack into it with a saw. By the end of the afternoon 2 ledges are made and fit snugly into the recess. Yes there are 2. The one against the wall had to be slightly taller that the original tap location in order to cover the tap caps thingys but is way too high to be used for feet. By having a second at a more appropriate height the need is met without looking out of place. And if ever children use the shower there is somewhere for their bathroom playtime goodies :)
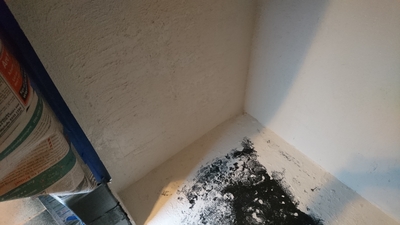
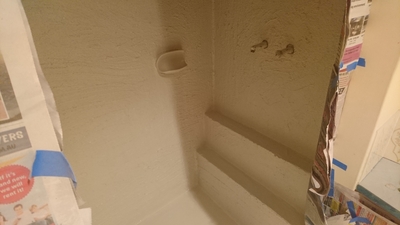
At this point things get a little tricky. In order to solve and prevent leaks etc in the future the whole shower enclosure needs to be sealed with a waterproof barrier paint. Normally we should remove the tiles and go for it but I am waaaaay too lazy for that. Another problem is that the XPS foam insulation panels kinda melt when used with the rubber paint (it is solvent based). Great if you are sticking them together but lousy for anything much else. However, during some earlier experimentation with the paint sprayer I discovered that the rubber paint does not melt the panels if there is something like a render between. Fortunately I have just the thing - some paint/render material ready for the garage project. Actually I am using the fine render material on the inside of the garage cos it will go through the fancy spray gun machine - very cool! So the coarse material can be used for other projects (like this) without any problem from me :) Another trip to the hardware shop for a render 'mitt'. This is a like a great whacking sheepskin glove, just with the furry side out. Apply render by scooping it from the tub and smoosh it around until you are happy with the finish! I have seen people use the mitts to apply the render then use a long straight edge to get a nice smooth finish. I am not convinced that would be useful here, wanting a good stippled finish to help make for a non-slip wall so instead attempted a traditional stucco finish. Came out rather well! So, cut the ledges to size then pulled them out. Applied a couple of thick undercoat rubber layers. Inserted the ledges, then stucco over the lot.
Also used a bunch of the stucco stuff to fill some of the floor holes and finish getting levels right where new and old floors meet.
That all took a few days especially with waiting for paint layers to settle down and see where additional material would be needed. This is especially important for the rubber paint - it does NOT adhere at all well if there is even the slightest hint of moisture. I found that out the hard way when using it to paint a car and got bubbles... grrr. Ah well not a mistake you will make, right!?
While that all was settling etc I spent the 'waiting for paint to dry' time to finish investigation into a suitable floor material. Tiles? Nup, the landlord can't walk on those without pain remember. Actually we have been chasing suitable rubber flooring for ages, looking at all sorts of options. I took his list and visited several places to check out their products and assess water action and how squishy they actually are. After discounting many many options, I ended up taking a punt on a flooring material that is closed cell foam on one side but has a rubber finish on the other. At 7mm thick it seemed to be a possibility. (I had already successfully used the rubber paint as a closed cell foam adhesive for other projects, so I knew it did not melt the foam but would act as an adhesive without any real trouble).
However it did not go so well. I painted another couple of coats of the rubber paint over the stucco and floor then laid the new rubber mat floor with the rubber side down (foam side up). Placed a bunch of stuff to hold it all down and off to bed for me.
Imagine my disappointment when I went to check on progress the next morning and found that the rubber paint had reacted with the rubber floor mat and buckled stretched and generally did something other than what was wanted. unnngh. After a few abortive attempts at remedial action I just ripped it all out and went on with layering white rubber paint over the black seal coat. Actually a note here - the white does not cover nearly as well as the black. Don't be asking me why, it just is. Have a look at the pics and see for yourself! Anyway I had to persevere with the white because the final colour coats needed the white to allow those colours to 'pop'. shrug.
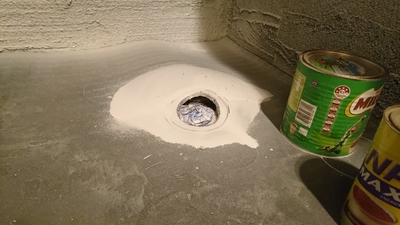
The next day I went on another foam search, and ended up at an insulation place. One of their products is a closed cell foam insulation material designed to go in double-brick walls. It has an aluminium surface to one side (something about heat reflection) and a variety of thickness of foam. So I got some 10mm thick and large enough for the floor and away I went. Stopped at the local hardware for some contact adhesive cos I really didn't have time to experiment with rubber adhesion to the alumnium. Using the original (failure) as a template had the new floor cut to size and test fit. Cool. Carefully cut the drain hole, and hey presto a new floor.
Contact adhesive is fun. If you can afford to make errors. The tins suggested 5 square metre coverage. Ok, said I, this shower is not even 1.5 so all good. Wrong. I used the entire tin, then made an emergency dash for another tin to go on before the first lot went off! Made it from first pour to second complete tin in just under 30 minutes. Talk about close to the mark! Even then it was JUST enough and no more. I guess bumpy concrete floors are adhesive soaks, even with several layer of rubber seal! The alloy border thingy went in and VERY carefully the new floor went down. Phew! Again it was weighted down to make sure of good adhesion. The next morning was a bit nerve-wracking, but turns out that this second attempt was the charm cos it was a ripper with no attempt at movement even around the drain hole (which actually had me a bit worried). Phew!
That day I laid in as many layers of white rubber coating as I could. This identified any areas needing fill etc. Also, it seems the foam floor soaked up the paint quite quickly at the cut edges etc. That is probably because I used a knife instead of the heat cutter (cos of the aluminium backing - really don't feel like electrocuting myself!). So off again to the hardware shop, this time for some paintable white sealant that would not melt under the influence of solvent paint. Fortunately the local has a really good selection of stuff :)
So, sealant went on last thing that night. I was especially careful to get good coverage at the alloy edge and around the drain hole - both areas where a build up of rubber sealant is going to be needed. Around the edges (where floor meets wall) I got busy with a bunch more render as fill.
By now the three day project had taken a week. sigh.
Anyways, the next day was spent running more rubber paint and filling any spots that showed as the day went along. At the end of that the whole enclosure was starting to look quite cool with the rubber paint providing a nice thick continuous sealed surface from drain hole to the top of the original tiles :)
You can see in the pics that the original tile colours are a cottage cream background with blue accent, and blue floor. The Landlord wanted blue for the whole recess. brrr cold colours that would have you feeling like being in a pool or something, yuck.
Instead I got some custom pigment made up by the supplier of the rubber paint and used that to make up 8 litres. Probably a bit much pigment, but coverage over the white was excellent. Then custom made 4 litres of blue which I first applied by spray. DO NOT DO THAT. Man did I have some repainting to do as a result of that!
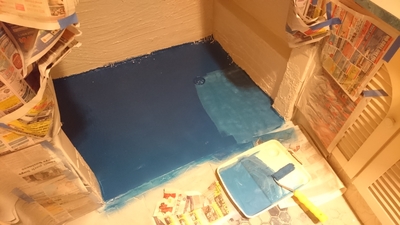
Anyways, in an attempt to get some colour interest in the floor I tried painting the blue using a small roller in criss-cross patterns. I was hoping that this would result in a kind of chequered pattern. Nup, but it was a little blotchy. Looking at it reminded me of how marble background colour is not consistent so thought I could get a kind of marble finish by manipulating the rubber floor while the whole was curing off. You can do this by understanding that when the outer is touch-dry, it is likely that underlying layers are still curing together. Simply applying pressure will cause the top layer to 'crack' a little allowing the still liquid layers below to show through. That worked but I was still not over happy with it.
So the next day I rollered over the floor with clear and caused the gaps to close up by using an air brush (without paint) to cause the top layers to merge. Once tidied up I could apply a whole bunch of clear over the lot to add depth and a small amount of glossy finish.
Installed the shower rose and the new tap covers and levers. Removed most all of the masking and it looks and feels great!
Overspray etc is easily removed. I use a normal eraser (you know, the one you used at school) and the oversrpay just comes right off. Easy peasy!
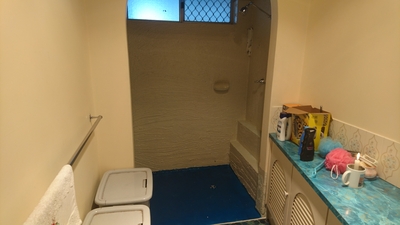
The landlord got back from his trip before it was completely finished - as always there is a little touching up etc to be done. But is he happy with the end result? OH Yeah! Squishy floor, wet-floor style. Quarter-turn tap-ware. Who said a custom bathroom is hard!
Now he wants custom glass doors. Sigh.
Notes:
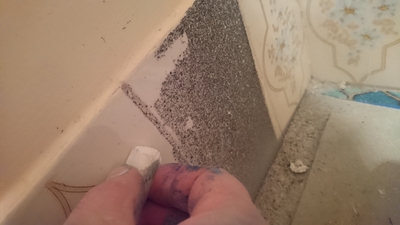
How to keep the stippled wall clean is really simple. Spray with '30 seconds', a product designed for removal of moss and lichens and mould from exterior walls and stuff. Leave it for a bit (maybe overnight) then spray it off with the shower rose the next morning. Next?
Do the walls feel rubbery too? For sure. Are they non-slip? Totally :)
Is the ledge arrangement strong enough? Well I have already stood on it to remove some masking so I guess so.
Is the floor non-slip. Oh Yeah! The rubber paint stuff seems to retain a bit of stickiness even when wet but added to sinking in to the foam and the floor is really non-slip.
How well will this wear and last? That remains to be seen...